Drip Irrigation: A Practical Guide for Home Gardens
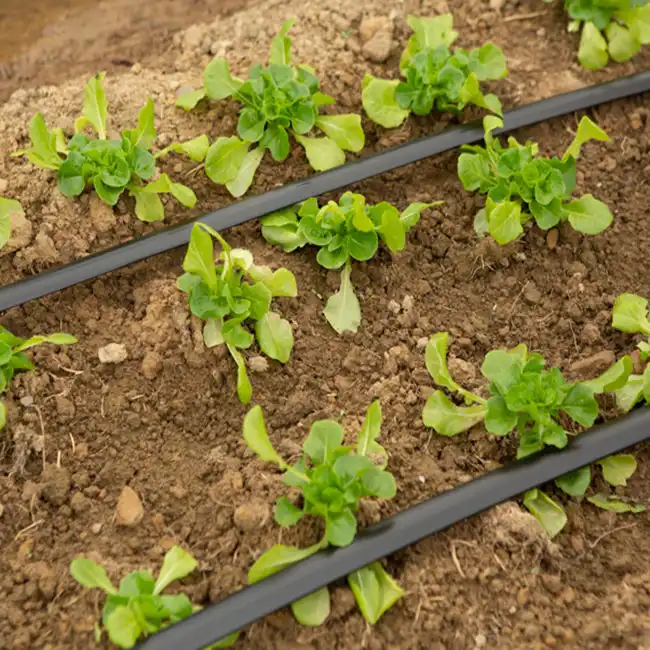
Drip irrigation delivers water slowly, through small emitters, right at the base of each plant or along a row. Very little is lost to evaporation or runoff, the leaves stay dry, and the paths between beds stay dry too, so fewer weeds come up there. Hooked to a timer, a drip system waters the garden the same way every time, which is what tomatoes, peppers and most other crops want.
The parts of a home drip system
From the faucet outward, a typical hose-fed system has:
- Backflow preventer (vacuum breaker): keeps garden water, and any fertilizer you inject, from siphoning back into your household plumbing. Many areas require one.
- Timer (optional but worth it): battery-powered hose-end timers are inexpensive.
- Filter: emitter openings are tiny, so a 150- to 200-mesh screen filter is needed to stop grit and debris from clogging them.
- Pressure regulator: household pressure is often 40 to 80 psi, while most drip components are designed for about 25 psi. Without a regulator, fittings can blow apart.
- Mainline tubing: usually 1/2-inch polyethylene tubing that runs along or through the beds.
- Emitters or drip line: either individual emitters punched into the mainline (or on 1/4-inch tubes branching from it), or tubing with emitters already built in.
- End caps or flush valves at the end of each line, which you open to flush out sediment.
Types of drip systems
Inline drip tubing (dripline). Tubing with emitters built in at a fixed spacing, commonly 6, 12 or 18 inches. It is the easiest option for vegetable beds and rows: lay one line per row of plants, or two to three lines across a 4-foot bed. Use closer emitter spacing in sandy soil, where water spreads less sideways, and wider spacing in clay.
Individual emitters. Punched into solid tubing exactly where each plant is. Best for widely spaced plants such as shrubs, fruit trees, big tomato plants and containers. Emitters are rated in gallons per hour (gph), commonly 0.5, 1 or 2 gph, so you can give a large plant more water than a small one on the same line.
Pressure-compensating emitters deliver the same flow along a long run or on a slope, where ordinary emitters would put out more at the low end. They cost a little more and are worth it on uneven ground.
Micro-sprayers and bubblers. Small spray heads on the same tubing, for ground covers, seedbeds and densely planted areas where drip spots won't cover the whole surface. They wet a wider area but lose more to evaporation.
Subsurface drip. Drip line buried a few inches below the surface, deeper on farms. It is used under lawns and in permanent plantings such as vineyards. In a vegetable garden that gets dug and replanted, buried lines get damaged, so most home gardeners lay drip line on the surface and cover it with mulch, which gets most of the same benefit.
How long to run it
There is no single answer, because it depends on your soil, emitter flow and weather. Find out for your garden: run the system for an hour, wait a few hours, then dig a small hole beside an emitter and see how deep and wide the soil is moist. You want the root zone, roughly the top 6 to 12 inches for most vegetables, wetted through. Adjust the run time until it is, then water less often but for that full time, rather than a little every day. Sandy soil needs shorter, more frequent runs; clay soil can take longer runs less often.
To estimate how long it takes to apply a given amount, add up the emitters. A 4-by-8-foot bed with three 8-foot runs of dripline, emitters every 12 inches at 0.5 gph, has about 24 emitters putting out 12 gallons an hour. An inch of water on that 32-square-foot bed is about 20 gallons, so it takes roughly an hour and a half to two hours.
Maintenance
- Flush the lines at the start of the season and every month or two by opening the end caps and running water until it comes out clear.
- Clean the filter regularly, more often if you use well water or rainwater.
- Walk the lines now and then with the water on to check for clogged emitters, leaks and tubing chewed by animals.
- Winterize in cold climates before the first hard freeze: drain the lines and bring the timer, filter and pressure regulator indoors, since trapped water can crack them.
Fertilizing through drip
With an injector or a siphon attachment you can feed water-soluble fertilizer through the system (fertigation), putting nutrients right at the roots. Always use a backflow preventer when you do this, and flush the lines with plain water afterward so residue doesn't clog the emitters.
Pros and cons
Drip is the most water-efficient way to irrigate a garden, keeps foliage dry, waters consistently, and saves a lot of time once installed. It costs more than a soaker hose and takes some planning, the tubing gets in the way when you dig or replant, and it needs regular flushing and filter cleaning. For a simpler, cheaper option for straight beds, see soaker hoses, and for how drip compares with other methods, see the irrigation overview. Drip also works well with rainwater harvesting, provided you use a pump or a kit designed for low gravity-fed pressure.